How to Contour Like a Pro
Master the art of contouring with our step-by-step guide and expert tips for a flawless, sculpted look every time.
Understanding Contouring Basics
Contouring is an art that involves using makeup to enhance and define the natural structure of your face. By strategically applying darker and lighter shades, you can create the illusion of shadows and highlights, making certain features stand out while downplaying others. Contouring typically involves two main products: a contour powder or cream that is a few shades darker than your natural skin tone, and a highlighter that is a few shades lighter. The key is to blend well to avoid harsh lines and achieve a natural look. Whether you're aiming for a subtle everyday look or something more dramatic, mastering the basics is essential for achieving professional results.
Choosing the Right Products
Selecting the right products is crucial for effective contouring. You'll need a contour product that complements your skin tone—cool undertones work best for fair skin, while warm undertones suit deeper complexions. Highlighters should have a slight shimmer to catch the light, but avoid anything too glittery for a more natural finish. Cream products are great for dry skin and provide a dewy finish, while powders are ideal for oily skin and offer a matte look. Investing in good-quality brushes or sponges can also make a significant difference in application and blending.
Preparing Your Canvas
Before you start contouring, it's essential to prepare your skin properly. Begin with a clean, moisturized face to ensure a smooth application. Applying a primer can help your makeup last longer and create an even base. Next, apply your foundation and concealer as you normally would, setting the stage for your contouring products. Some prefer to set their foundation with a translucent powder before contouring, while others go straight in with their contour products. Experiment to see what works best for your skin type and desired finish.
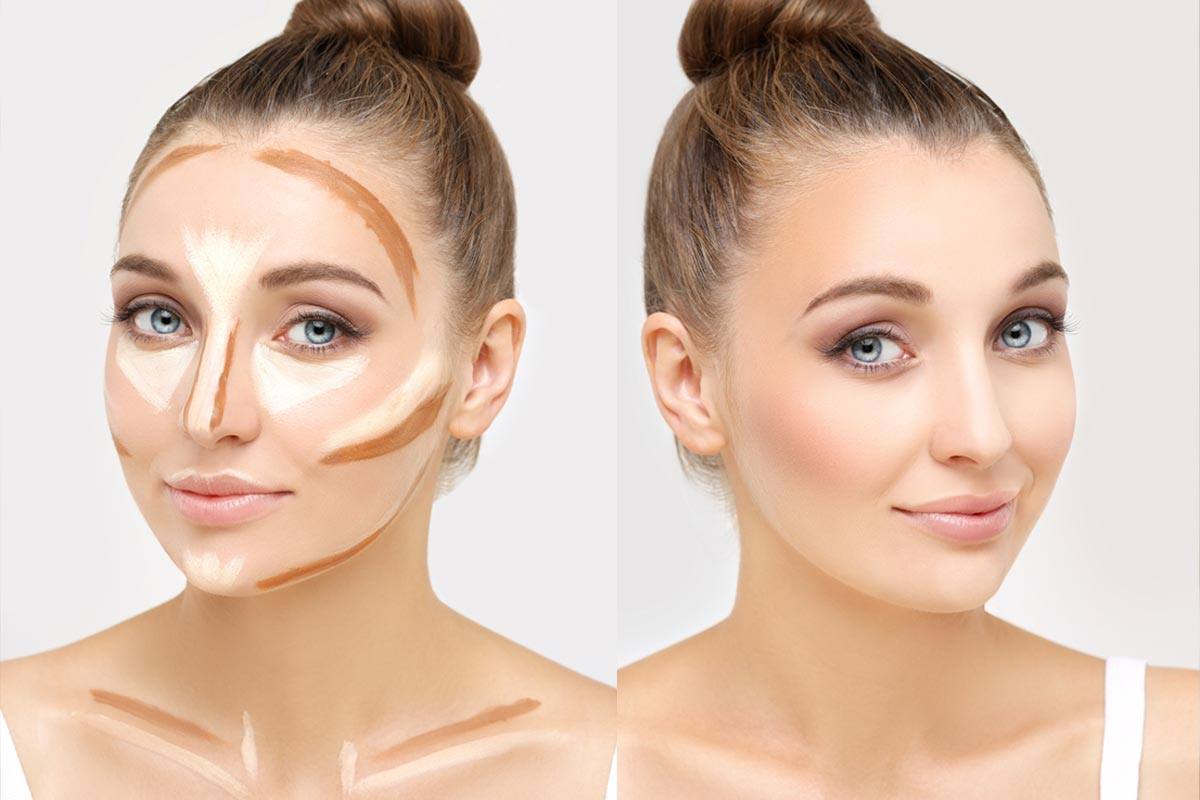
Mapping Out Your Face
Understanding your face shape is key to effective contouring. Common face shapes include oval, round, square, and heart-shaped, and each requires a slightly different approach. For example, if you have a round face, you'll want to contour along the sides of your forehead, under your cheekbones, and along your jawline to create the illusion of more defined angles. For a square face, focus on softening the jawline and temples. Use a light hand and build up the product gradually to avoid overdoing it.
Applying Contour and Highlight
Start by applying your contour product in the areas where you want to create shadows. Common spots include the hollows of your cheeks, the sides of your nose, your jawline, and your forehead near the hairline. Use a contour brush or a damp sponge to blend the product seamlessly into your skin. Next, apply your highlighter to the high points of your face: the tops of your cheekbones, the bridge of your nose, your brow bone, and your cupid's bow. Blending is crucial here to ensure there are no harsh lines between the contour and highlight.
Blending Techniques
Blending is the most critical step in contouring. A well-blended contour looks natural and seamless, while poorly blended makeup can look harsh and artificial. Use a damp beauty sponge or a fluffy brush to blend your contour and highlight products. Use small, circular motions to diffuse the product into your skin. Take your time with this step, as rushing can result in uneven application. If you feel like you've applied too much product, you can always go over it with a bit of foundation or translucent powder to tone it down.
Setting Your Contour
Once you're satisfied with your contouring and highlighting, it's time to set your makeup to ensure it lasts all day. Use a translucent setting powder to lightly dust over the contoured areas, locking everything in place. For those with oily skin, a mattifying powder can help control shine throughout the day. If you prefer a dewy finish, opt for a setting spray that adds a subtle glow. Setting your makeup not only prolongs its wear but also helps to blend all the elements together for a cohesive look.
Final Touches and Tips
To finish your look, add a touch of blush to the apples of your cheeks for a healthy flush of color. Make sure to blend it well with your contour to avoid any harsh lines. If you want to add extra dimension, you can also apply a bit of bronzer to the perimeter of your face. Remember, practice makes perfect. The more you experiment with different techniques and products, the better you'll become at contouring. Don't be afraid to try new things and adjust your routine based on what works best for you. With time and patience, you'll be contouring like a pro.